How to Paint Loose Tropical Leaves with Caran d’Ache Watercolor Crayons
Tropical leaves are one of my favorite subjects for practicing loose, expressive painting. Their bold shapes, dramatic veins, and endless variations in green make them especially well suited to Caran d’Ache watercolor crayons.
Unlike traditional watercolor, watercolor crayons let you draw, layer, scribble, and make marks directly on the paper before adding water. That combination gives you the freedom of drawing with the fluidity of watercolor—and it is perfect for creating tropical foliage that feels energetic rather than overly controlled.
In this tutorial, I’ll show you how to build a small collection of loose tropical leaves using simple shapes, layered color, water, and expressive mark making.
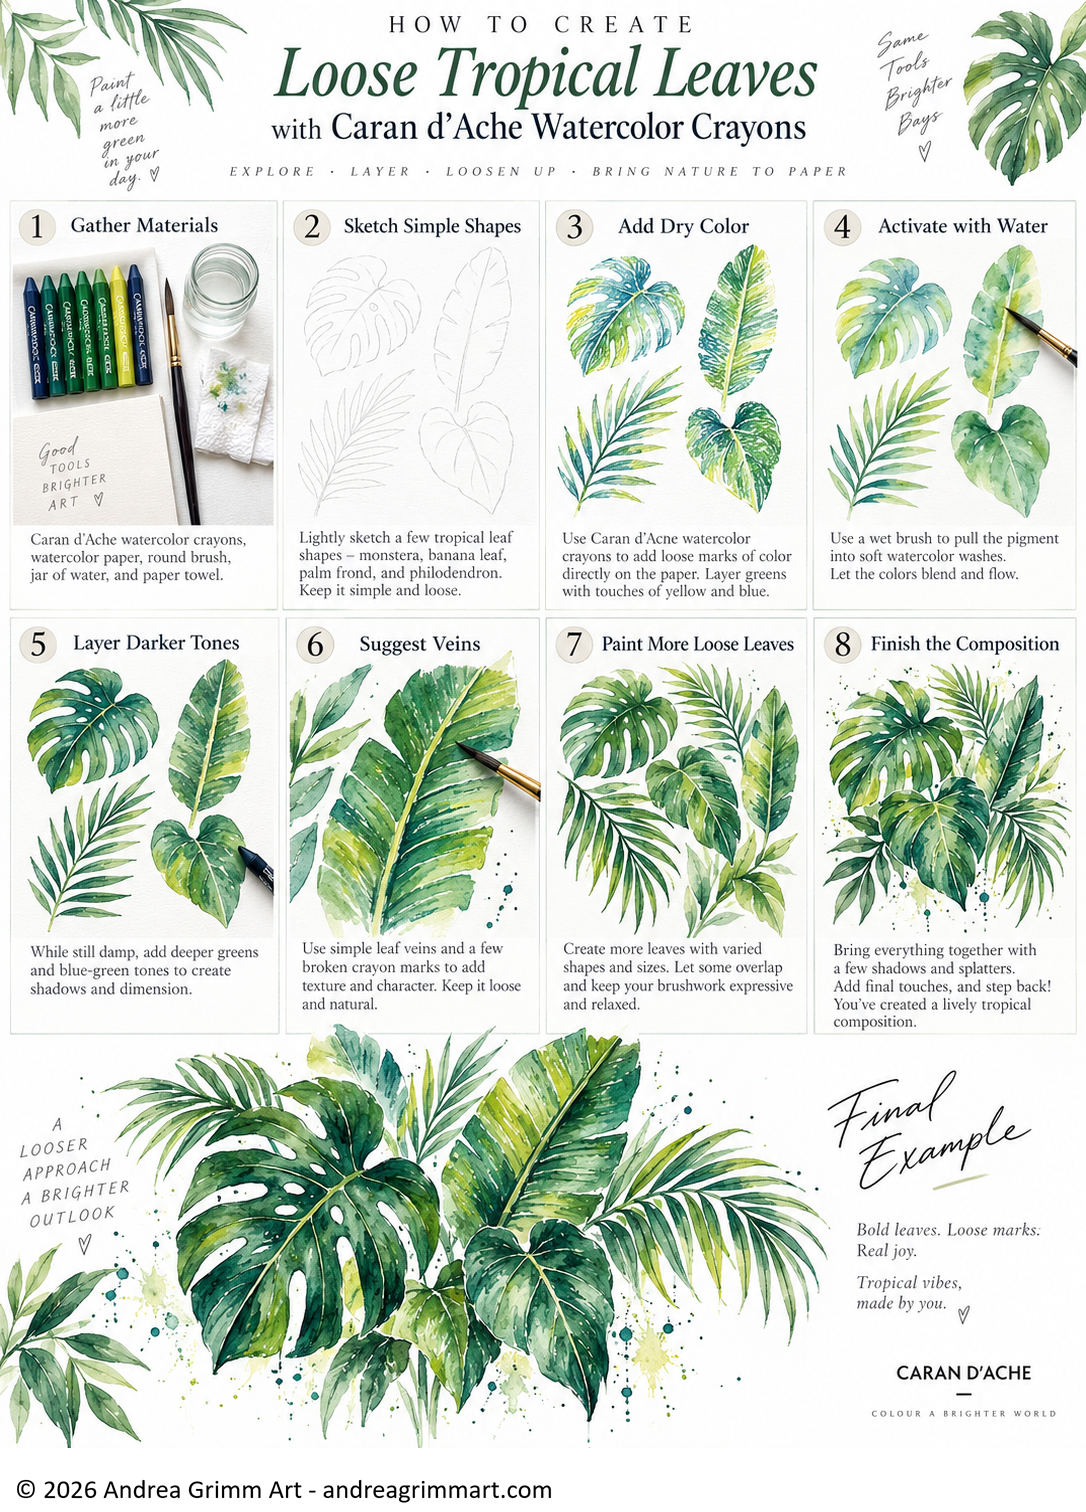
What You’ll Need
For this project, you only need a few basic supplies:
Caran d’Ache watercolor crayons
Watercolor paper
A medium round watercolor brush
A smaller round brush for details
A jar of clean water
Paper towel
Pencil and eraser, optional
For the color palette, choose several greens rather than relying on only one. I like combining a bright yellow-green, a medium natural green, a blue-green, and a deeper green or blue for shadows.
You can also introduce small touches of yellow, turquoise, or blue to keep the foliage from becoming flat.
Step 1: Begin with Simple Leaf Shapes
Start by lightly sketching a few tropical leaf shapes.
Try including a variety such as:
Monstera
Banana leaf
Palm frond
Philodendron or heart-shaped leaf
Keep the drawing simple. You do not need to carefully outline every edge or vein.
Think of the sketch as a loose framework that will guide your color rather than something you need to stay inside.
One of the easiest ways to make botanical paintings feel stiff is to become too attached to the original drawing. Give yourself permission to let the paint move beyond those lines.
Step 2: Add Dry Watercolor Crayon
Before reaching for water, begin drawing directly onto the paper with your watercolor crayons.
Use loose strokes rather than filling the entire leaf with solid color.
Place brighter greens and yellow-greens where light might hit the leaf. Add deeper greens and blue-greens toward the base, center vein, or underside of the form.
Leave some areas of the paper untouched.
Those small areas of white will become natural highlights once the pigment is activated.
Try changing the direction of your marks so they follow the structure of each leaf. On a banana leaf, for example, allow the marks to move outward from the central vein. On a monstera, let them follow the direction of the individual lobes.
Step 3: Activate the Color with Water
Now use a damp round brush to begin dissolving the watercolor crayon.
You do not need to blend every mark completely.
Instead, pull some of the pigment into soft washes while allowing other crayon marks to remain visible.
That contrast between dissolved watercolor and visible drawing is one of the qualities that makes watercolor crayons so interesting.
Work one section at a time and allow adjacent colors to mingle naturally.
If the paint begins to look too smooth or polished, stop blending.
Loose botanical painting becomes more interesting when the viewer can still see evidence of your hand.
Step 4: Let Colors Mix on the Paper
While the leaf is still damp, introduce small amounts of neighboring colors.
Drop yellow-green into a lighter section.
Touch blue-green into a shadow.
Allow darker green to drift outward from the central vein.
You can gently encourage the colors with your brush, but avoid repeatedly brushing over the same area.
Too much blending can quickly turn fresh greens muddy.
Instead, place the color and allow water to do some of the work for you.
Step 5: Layer Darker Tones
Once the first layer has partially dried, begin adding depth.
Use your darker watercolor crayons directly over the painted surface.
Concentrate darker values:
Along central veins
Under overlapping leaves
Near the bases of leaves
Along selected edges
In folds or shadowed sections
Then soften only part of those marks with a damp brush.
You want some edges to disappear into the wash and others to remain visible.
This mixture of soft and hard edges gives the leaves more dimension.
Step 6: Suggest the Veins
Leaf veins are useful, but they do not need to be carefully rendered.
Instead of drawing every vein, suggest only a few.
You can use the edge of a watercolor crayon for broader broken marks or use a small damp brush to pull thin lines through the leaf.
Try varying the pressure and spacing.
A few irregular marks usually feel more natural than a perfectly symmetrical pattern.
The goal is not botanical precision. The goal is to give the viewer just enough information to understand the structure of the leaf.
Step 7: Build a Loose Tropical Composition
Once you are comfortable painting individual leaves, begin combining them.
Mix different shapes and scales.
Place a large monstera beside a slender palm frond. Add an upright banana leaf and tuck smaller heart-shaped leaves into the open spaces.
Allow some leaves to overlap.
Overlapping immediately creates depth and makes the grouping feel more natural.
Also pay attention to negative space. You do not need to fill every part of the paper.
Open areas around the foliage give the composition room to breathe.
Step 8: Add Expressive Finishing Marks
This is where you can move beyond simply painting leaves and begin developing your own visual language.
Add a few dry crayon marks over the finished watercolor.
Scratch in broken lines.
Deepen selected shadows.
Add a few splatters with your brush if they suit your style.
You might also leave some edges unfinished or allow a wash to drift slightly beyond the original drawing.
These small imperfections often create the looseness and energy that make watercolor paintings feel alive.
A Few Tips for Painting More Loosely
If you tend to overwork your paintings, try limiting the number of brushstrokes you allow yourself for each leaf.
Use a larger brush than feels comfortable.
Hold your brush farther back from the tip.
And periodically step away from the painting.
When you look at it from several feet away, you will often discover that the marks already communicate far more than you thought they did.
Another helpful approach is to deliberately leave one section of each leaf unfinished. That small decision can prevent you from continuing to refine an area that already works.
Let the Crayon Marks Stay Visible
One of the reasons I enjoy Caran d’Ache watercolor crayons is that they let a painting exist somewhere between drawing and watercolor.
You do not have to dissolve every mark.
In fact, some of the most interesting areas often occur where a waxy crayon line sits beside a transparent watercolor wash.
That combination creates texture, movement, and personality.
Instead of trying to hide the materials you used, let them become part of the finished artwork.
Final Thoughts
Loose tropical leaves are a wonderful subject for learning how to give up a little control.
Start with the basic structure of the leaf, add color instinctively, activate only part of the pigment, and allow water to create variations you could not completely plan.
The more you practice, the easier it becomes to recognize the point where a painting has enough information—and to stop before every mark has been explained.
That is often where looseness begins.
Try filling an entire page with individual tropical leaves before creating a finished composition. Experiment with different combinations of green, vary the amount of water you use, and notice which marks you enjoy enough to repeat in future paintings.
Most importantly, let the materials surprise you.
