How to Paint a Toucan with Caran d’Ache Watercolor Crayons
There is something irresistible about painting a toucan. The oversized beak, dramatic dark feathers, and tropical surroundings give you an opportunity to work with bold color while still creating a painting that feels loose, organic, and distinctly watercolor.
For this toucan painting, I used Caran d’Ache watercolor crayons because they offer an interesting combination of drawing and painting. You can apply them dry for texture and precise marks, activate them with water for transparent washes, or layer dry crayon back over painted areas to restore detail.
The process is surprisingly approachable. Rather than trying to complete the bird all at once, I build the painting gradually—beginning with a light drawing, establishing the atmosphere behind the bird, then adding increasingly defined layers of color and texture.
Use the illustrated guide below as a visual reference as you work through the steps.
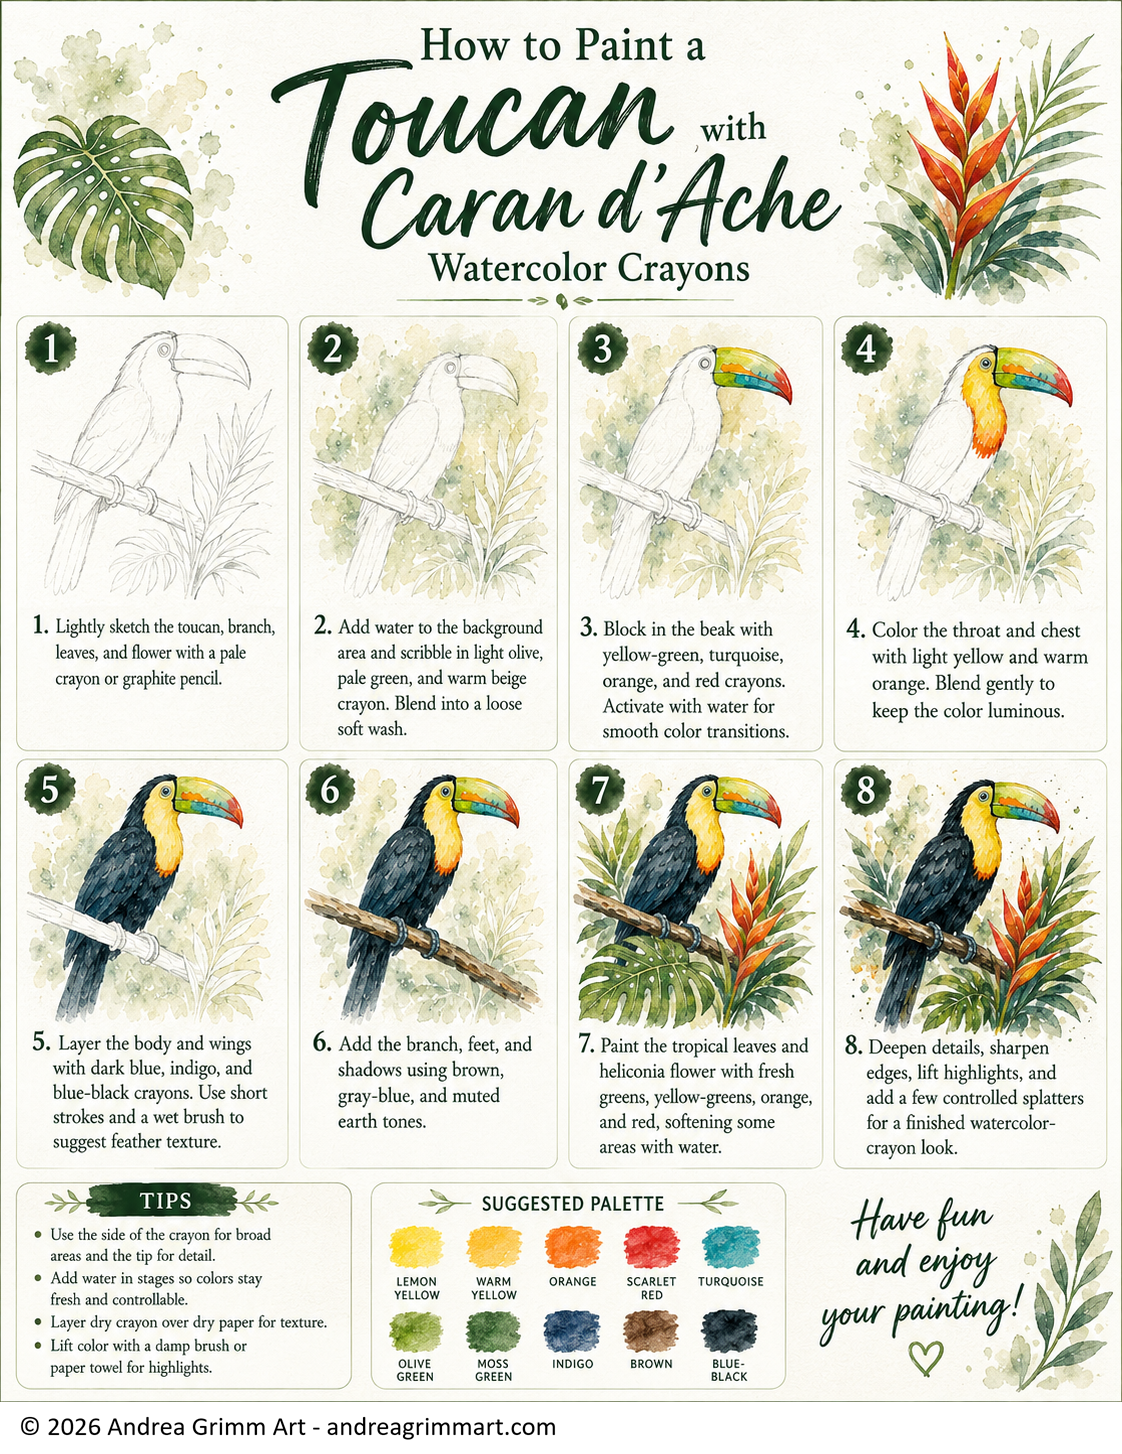
Painting a tropical toucan step by step with Caran d’Ache watercolor crayons.
Materials
You don’t need a large collection of supplies for this project. I recommend:
Caran d’Ache watercolor crayons
Watercolor paper
Graphite pencil or a pale watercolor crayon
Round watercolor brushes in a few sizes
Clean water
Paper towel
Optional waterproof fine-liner or dark watercolor pencil for final details
For the paper, choose something sturdy enough to tolerate several applications of water. A good-quality watercolor paper will make blending significantly easier than lightweight drawing paper.
Suggested Color Palette
For this painting, I use a relatively small tropical palette:
Lemon yellow • warm yellow • orange • scarlet red • turquoise • olive green • moss green • indigo • brown • blue-black
You don’t need these exact colors. The important thing is to have warm yellows and oranges for the toucan's throat and beak, cool turquoise or blue-green, deep blue-black values for the feathers, and several natural greens for the foliage.
Step 1: Begin with a Light Drawing
Lightly sketch the basic shapes of the toucan, branch, leaves, and tropical flower.
Keep your initial drawing simple. At this stage, concentrate on proportion rather than detail. Pay particular attention to the toucan’s beak—it is such a dominant part of the composition that its size, angle, and relationship to the head need to feel convincing.
I like to indicate only the major feather groups rather than drawing every feather individually.
The same principle applies to the foliage. Establish the direction and overall shape of the leaves, but leave yourself room to interpret them more loosely once you begin painting.
Step 2: Establish the Background First
Before painting the toucan, wet portions of the background with clean water.
Scribble light olive, pale green, and warm beige or earthy crayon into the damp areas, then soften the pigment with a wet brush.
Don't try to completely fill the background.
Instead, allow patches of untouched paper to remain between the washes. Those irregular white spaces create light and air around the bird and keep the painting from becoming visually heavy.
This is also a good place to embrace imperfect edges, blooms, and subtle variations in pigment.
The background should suggest a tropical environment rather than describe every leaf.
Step 3: Block In the Toucan's Beak
The beak is one of the most enjoyable parts of the painting.
Begin by dividing it loosely into color areas using yellow-green, turquoise, orange, and red.
Apply the crayon directly to dry paper in some places and lightly dampened paper in others. Then use a clean wet brush to pull the colors toward one another.
Try not to blend everything completely.
Leaving some transitions visible creates much more interesting color than turning the entire beak into one smooth gradient.
Allow the warm and cool colors to interact while maintaining the distinctive color sections that give the toucan its tropical character.
Step 4: Add the Golden Throat and Chest
Next, establish the toucan's luminous throat using light yellow and warm yellow, followed by touches of orange.
Begin with the lightest yellow and preserve some of the white paper underneath.
Gradually introduce warmer yellow and orange toward the lower portion of the throat.
Use water sparingly here.
Too much water can flatten the color and eliminate the beautiful distinction between the individual crayon marks. I prefer to soften selected passages while allowing other marks to remain visible.
That combination of drawn texture and watercolor is part of what makes watercolor crayons so expressive.
Step 5: Build the Dark Feathers
Now begin developing the body and wings with indigo, dark blue, and blue-black.
Rather than filling the bird with a single dark shape, build the feathers gradually.
Use short directional strokes that follow the way the feathers overlap. Then touch some of those marks with a damp brush so they soften without disappearing completely.
Leave subtle differences between the darkest shadows and slightly lighter blue-gray areas.
Those small shifts in value are what prevent the bird from looking like a flat black silhouette.
You can also leave tiny fragments of lighter paper between feather shapes to suggest reflected light.
Step 6: Paint the Branch, Feet, and Shadows
Once the bird is established, the branch helps anchor it within the composition.
Layer brown, gray-blue, muted ochre, and darker earth colors along the branch. Let some colors overlap so the bark feels irregular rather than uniformly brown.
Add darker values underneath the branch and around the toucan's feet.
For the feet themselves, keep the drawing relatively understated. You want them to convincingly grip the branch without competing with the bird's face and beak.
This is also a useful stage for strengthening the shadow where the bird meets the branch.
Step 7: Develop the Tropical Foliage
Now you can begin defining the surrounding leaves and tropical flowers.
Use a mixture of olive green, moss green, yellow-green, and deeper blue-green for the foliage.
Vary your technique from leaf to leaf.
Some can be painted with a wet brush for soft, translucent shapes. Others can retain visible crayon marks. A few darker, sharper leaves can be added over the softer background washes.
For the heliconia-style flowers, layer orange and red, preserving narrow areas of yellow or light orange where the petals catch the light.
This variety of sharp and soft edges helps establish depth.
The most defined foliage should generally appear near the toucan, while more distant foliage can dissolve into the background.
Step 8: Refine the Details
Once everything is dry, assess the painting as a whole before adding more color.
This final stage is less about adding objects and more about strengthening contrast and choosing where you want the viewer to look.
Deepen selected dark feathers. Sharpen the outline around portions of the head and beak. Reinforce the eye. Add small highlights where necessary.
You can also draw dry watercolor crayon over completely dry painted areas to restore texture.
The goal is not to sharpen every edge.
Instead, concentrate your strongest detail around the toucan's eye, face, and beak, then allow some of the surrounding foliage and feathers to remain softer.
Finally, add a few controlled splatters if you want to reinforce the loose watercolor character of the piece.
A Few Tips for Working with Watercolor Crayons
One of the advantages of Caran d’Ache watercolor crayons is that you don't have to treat them like traditional watercolor.
Try using the side of the crayon for broad passages and the point for fine marks. Add water gradually rather than saturating every layer. Draw dry pigment over dried watercolor washes to introduce texture and broken color.
If an area becomes too intense, use a clean damp brush or paper towel to lift some of the pigment.
And most importantly, don't activate every crayon mark with water.
Some of the most beautiful passages come from allowing crisp dry marks to sit beside transparent watercolor washes.
Let Some of the Drawing Remain Visible
When I work with watercolor crayons, I don't want the final painting to disguise the material completely.
The crayon marks are part of the character of the piece.
A fully blended painting can begin to look like conventional watercolor, while the combination of scribbled marks, transparent washes, dry texture, soft edges, and concentrated pigment gives watercolor crayons their own visual language.
For this toucan, that contrast works especially well: the colorful beak can remain luminous and fluid, while the dark feathers contain more visible texture and the surrounding vegetation dissolves into loose washes.
The Finished Painting
Your finished toucan does not need to reproduce every feather or botanical detail.
What matters more is the relationship between the bold bird and the softer tropical environment surrounding it.
Keep the focal areas deliberate, allow some edges to disappear, and resist the temptation to keep refining every portion of the painting equally.
Watercolor crayons reward a little unpredictability.
Let the water move the pigment. Let some crayon strokes remain visible. Let portions of the foliage fade into suggestion.
That balance between control and spontaneity is where much of the beauty of this medium lives.
Have fun with it—and don't be afraid to make your toucan entirely your own.
